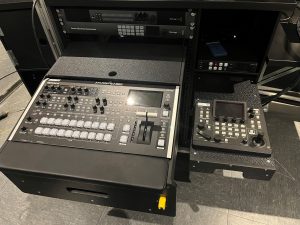
- Scenes can help you when you have different groups of settings for different types of events.
- Scenes will recall visual layouts, help create dissolve transitions, and more.
- The V-8HD can store and recall up to 24 unique scenes.
Versatile, portable, and reliable, the Roland V-8HD brings a world of creative options to live event switching. Here we’ll dive into the V-8HD’s sequencer which makes presets and macros even more powerful, allowing a single operator to execute perfectly timed cues with ease. Up to 1000 steps can be recorded in the sequencer, and each step can include both presets and macros. The sequencer brings all these powerful tools together.
Sequencer Applications
The V-8HD sequencer can help you when you have a list of show cues you want to follow. In addition, it is very useful when you want to automate your production with auto sequencing. It can help with operating for rehearsed content, like a show or podcast, or with timings, replace an operator entirely.
General Setup
You can run the sequencer steps manually in order, jump to a specific set, or automate the sequence to follow timings. Its controls are Next, Previous, Auto Sequence, and On/Off.
[Note that the representation of these controls varies depending on whether you’re using the hardware or V-8HD Remote app controls.]
Hardware Setup
- To enter Sequencer mode, go to Menu > Sequencer > Sequencer > On.
- Press the Menu button to exit the menu and you will see the Sequencer mode screen on the multi-view display. Here you will see the current list of steps in the sequencer.
- Start the sequencer by pressing the Auto button to manually advance through the sequence.
- Once you get to the second step in a sequence, the Cut button lights up. If desired, use this to go to the previous step.
- You can jump to a step in the sequencer by selecting it with the Value knob and pushing Enter.
[Note: If you use the Previous or Jump commands to select a scene or macro, it will cut to the end and not show the animation. When you use the Next command, animations will resume.]
Remote App Setup
- Tap the Sequencer button to open the sequencer screen. This shows the current list of sequencer steps and the sequencer controls.
- Tap the sequencer controls to operate the sequencer.
- To jump to a step, tap the Jump button, and then tap the desired step.
- To add a step, tap the Edit button, and then tap the Add New Function button.
Glossary
- Alpha Channel: Instead of the DSK removing Luma or Chroma from a source, it uses the Alpha Channel from a PNG file or a graphic system’s key source to determine the transparent areas.
- AUX: A bus that directly outputs a video source other than PGM. It does not support overlays. [Note: You can disable the AUX bus to enable Alpha Channel on the DSK.]
- Bus: A grouping of one or more video sources. The V-8HD has PGM, PVW, AUX, and Multi-View busses.
- DSK: Downstream Keyer. Primarily used for overlaying graphics with transparent areas, and for green screens. The V-8HD supports one.
- Keyer: Removes either Luma (black/white), Chroma (blue/green/custom), or Alpha from the DSK source. [Note: PinP 1 and 2 also support Luma and Chroma key.]
- Macro: A list of timed operations that are executed with a single button press.
- Multi-View: A 10-window output that displays HDMI inputs 1-8, PVW, and PGM.
- PinP: A Picture in Picture window. The V-8HD supports up to two.
- PGM: Program. This is the primary output. It combines the selected video input with any PinP and DSK overlays.
- Preset Memory: Referred to as scenes in this guide.
- PST: A preset (separate from scenes/preset memories). This is the input source that goes to Preview. A common workflow is to first select your PST source before performing a transition. This helps prevent switching mistakes.
- PVW: Preview bus. Swap this with the PGM input when you perform a transition. You can also use this to preview the PinP and DSK layers before sending them to PGM. [Note: To tie PinP and DSK layers to transitions, enable Effects Transition Sync in the System menu.]
- Scene: Referred to as a memory or preset memory in the V-8HD controls and menus. It’s like a snapshot of PGM and menu settings.
- Sequencer: A list of scenes, macros, and input selects that are executed manually or with timings.
- Transition: A cut, dissolve, or wipe between the PGM and PVW video busses.


