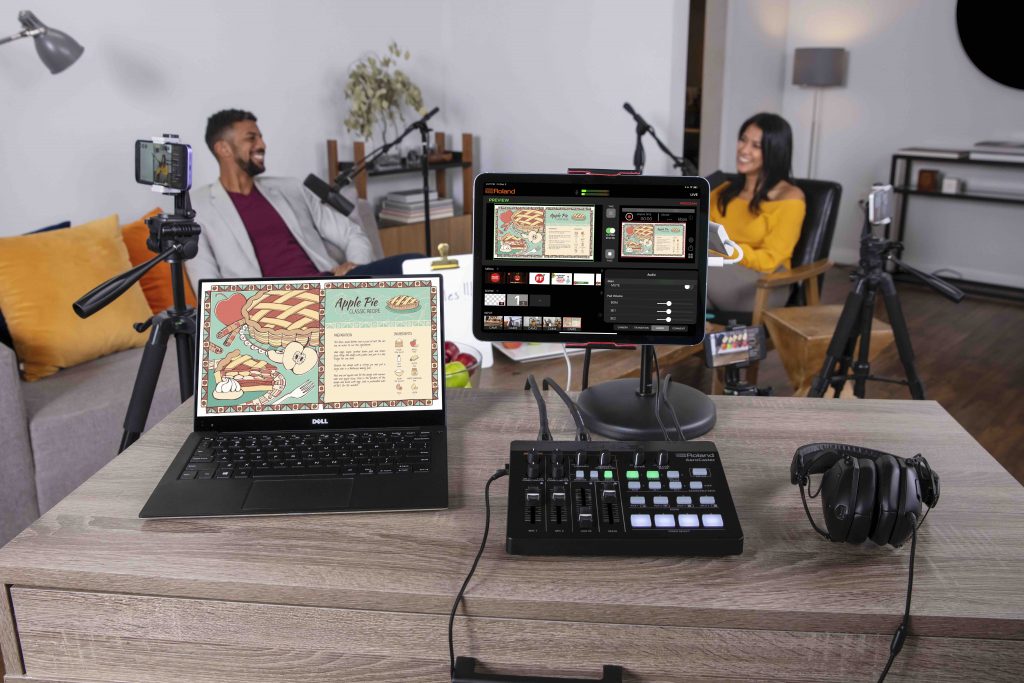
The AeroCaster Livestreaming System makes livestreaming easier than ever. Using just an iPad and up to four mobile devices, you can go live wirelessly on Facebook Live, YouTube, Twitch, and more. Plus, the VRC-01 is a full-featured mixer and audio interface that allows you to easily mix and monitor multiple sound sources. Using AeroCaster, it’s easy to turn the devices you own into a pro-level multi-camera setup for compelling content. Find out everything you need to kick off your livestreaming journey today.
FIRST STEPS
In this in-depth guide, you’ll learn how to:
- Install the AeroCaster apps on your mobile devices
- Connect the VRC-01 controller and video and audio sources
- Get the best audio mix
- Add media files and live text
- Create split screen and picture in picture layouts
- Set up your stream to go live
To begin, you’ll need an iPad, up to four iOS or Android smartphones or tablets, the VRC-01 hardware controller, the included USB cables, and microphones. If you don’t have a microphone, you can use your phone or tablet’s mic or use the built-in mic on the VRC-01.
iPad SETUP
Install Apps
First, download the AeroCaster Live app to your iPad from the App Store. Be sure to download the AeroCaster Live app, not to be confused with the AeroCaster Switcher app. Next, download the AeroCaster Camera app for your iPhone or Android mobile device. The first time you open the AeroCaster Live app and AeroCaster Camera app, they will prompt you for access. If you don’t accept initially, you will need to go into the device settings and change the permission. Here is a step-by-step guide.
In this example we’ll be using three iPhones, so each device will need the AeroCaster Camera app installed. If you want to screen share from a computer, you’ll need to install the Google Chrome web browser.
Connection Overview
Now, let’s discuss some connectivity options with the AeroCaster streaming system. Use a USB-C cable to connect the VRC-01 “DC 5V In” port to a 5-volt power adapter. If you have an iPad with a lighting connector, connect it to the VRC-01 “Device” port using the included lightning to USB cable. If you have an iPad with a USB-C connector, connect a cable with USB-C on both ends to the VRC-01 “Device” port. Remember to fully charge your mobile devices before starting a livestream.
Charge iPad During Streaming
You can also use an adapter to charge your iPad during livestreaming. If you have an iPad with a Lightning port, we recommend using a Lightning to USB 3 Camera Adapter. For iPads with a USB Type-C port, use the USB-C Digital AV Multiport Adapter.
User Interface Tour
Now, let’s go over the AeroCaster Live App UI interface. The AeroCaster Live app is your main studio where you set up and control your video and audio sources. The VRC-01 controller is linked to the app which gives you full control of your livestream and content.
At the very top of the screen is an audio meter that allows you to monitor your audio mix levels. In the top left corner is a video window with a green outline. This is Preview. By default, it’s the same as Program, the video window with a red outline, which is located to the right of it. Program is the final output; this is what your audience sees. You’ll revisit this after adding some camera sources.
In the top right corner, there are icons which allow you to start streaming and access the system menu settings. And in the bottom left corner, there are three rows of sources:
- Media contains imported Audio, Images, and Videos.
- Scene contains your layouts and overlays.
- Input contains up to five camera and browser sources.
In the bottom right corner, there are three menus to choose from, giving you easy access to remote Camera settings, video Transition effects, and additional Audio settings.
CAMERA SETUP
Connect a Camera
Now, we’ll cover how to connect a camera source. Sources send video and audio to the iPad via Wi-Fi, no video cables required. You can also use tethering on compatible iPads with a 4G or 5G data plan. There are two ways to connect sources to the AeroCaster Live app. Let’s look at both of them.
Install AeroCaster Camera
The first way to connect a source is to use the AeroCaster Camera app. When you open the app, you will see your device’s camera image, with some adjustment settings along the top and right side of the interface. You can also make these adjustments remotely by using the AeroCaster Live app.
Next, go back to the iPad with AeroCaster Live app and tap one of the [+] buttons on the Input row, and select the camera you want to connect. Please allow a few seconds for the camera to connect. Once you see a video thumbnail replace that [+] button, the camera is ready to use. You can also tap and hold that video thumbnail to rearrange, delete, or rename it.
At the end of the input row is an [Information] icon that gives you details on all connected sources, as well as an option to adjust the device’s audio level, if you are using it.
Google Chrome
The second way to add sources is with any computer running Google Chrome. When you tap the [+] button to add a camera, an option will appear below the camera list to “Add Web Browser source.” Tap that button and a short web URL will pop-up on screen.
Open Google Chrome on your computer and enter the URL. If you choose “Open Video Input Device” select a webcam from the drop-down list and click “Select.” For this example, we’ll be selecting “Start Screen Capture”, you have three options for viewing: the entire screen, a software window, or a tab in Chrome. Once your source is selected, click the [Share] button.
Then, click the [Connect] button to send the browser source to AeroCaster Live.
AeroCaster Camera App User Interface
Let’s now go over the UI interface found on the Aerocaster Camera app. Starting at the top left corner, the Camera icon switches between the front and rear lens. If you have more than one rear lens, the circular Shutter icon next to it switches between them. The Flashlight icon turns the device’s built-in LED light on and off.
Next to the Magnifying Glass icon are three buttons to zoom in and out. If you want to fine-tune the zoom setting, use the slider control in the AeroCaster Live app. On the right side, Exposure will brighten or darken your image. The default setting is Continuous, which adjusts the exposure throughout your stream. Auto will automatically adjust it once and then lock the setting. And Manual gives you full control over this setting.
White Balance adjusts the color. If the colors appear too warm or cool with the default Continuous setting, select and adjust the Manual option until your desired look is achieved.
Focus will sharpen or soften your image. The default setting is Continuous, which adjusts the focus throughout your stream. Auto will set and lock your focus and Locked allows you to manually adjust the focus with a slider. If using an “Ultra Wide” lens, the focus setting will be disabled by default.
The last setting is Stabilization, which can be helpful for camera sources that are handheld without using a gimbal. Finally, there is a Record button if you want to record individual cameras in addition to your video mix in AeroCaster Live. You can adjust the quality using the Record Bitrate setting.
AeroCaster Live Camera Settings
You can also adjust these settings from the iPad using the Camera menu in the bottom right corner of AeroCaster Live. Also, the Gear icon in the top right corner lets you change the quality output of the AeroCaster Camera sources. If you change this setting, you will need to close and restart each AeroCaster Camera for the change to take effect.
SWITCHING CAMERAS
Switching Sources
Now that we’re familiar with the AeroCaster Camera app UI, let’s go over how to switch camera sources. When you select a different source, it changes on both Preview and Program. If you want to see what an Input looks like or adjust your camera settings before sending it to Program, turn off the [to PGM directly] button.
Then, select a source and it will appear on Preview only. When you’re ready to send it to Program, tap the [Take] button. Also, selecting the [Fade] button will allow you to fade out the Program video. You can tap it again to fade in.
HDMI Out
iPads with USB-C connectors can also output full screen video with a compatible adapter and HDMI cable. If you want to see full screen video on the iPad itself, tap the [Share] icon in the top right corner of the Program window to make the video full screen on the iPad. You can tap it again to go back to the AeroCaster Live interface.
[Note: audio output is not supported at this time.]
AUDIO SETUP
Connecting a Microphone
Getting great audio with AeroCaster is quick and easy. While the VRC-01 has a built-in microphone, and you can mix audio from each connected smartphone, we recommend using a dedicated microphone. Any microphone with an XLR or TRS connector can be connected to the back of the VRC-01. It also supports condenser microphones, just turn on the 48-volt phantom power switch on the back, there is one for each microphone input.
Audio Adjustment
Set up a microphone. Before you start, turn on the [Direct Monitor] button and turn the [Gain] knobs all the way down if they are not already. On the left side, turn the headphone knob all the way down, connect your headphones, and turn it up to a comfortable level.
Start by setting up Mic 1. Slide the fader to the bold line three quarters of the way up. Now do the same for the Main fader. Adjust the input gain by slowly turning the [MIC 1] knob clockwise while talking into the microphone. Keep increasing it until the “Signal / Peak” indicator is mostly yellow.
Audio Effects
Next, slowly turn up the [Comp / Limiter] knob, this will apply compression to the signal, which brings quiet and loud audio closer together, while making the overall signal louder. If you turn this knob all the way up, it goes into limiter mode, which can help prevent distortion when things are loud. If you suddenly have loud talking or bump the microphone, the Limiter prevents sudden distortion of your audio.
The [Direct Monitor] button is disabled by default. This means that you hear the entire audio mix on your headphones, including imported media clips and the mics on your camera sources. You can still hear the VRC-01 mic and line inputs, but there will be a slight delay. Turn [Direct Monitor] on if you want to listen to only the VRC-01 mic and line inputs without any latency.
Note that the [Loopback] knob is disabled when using AeroCaster Live. When testing the microphone, press the [Low Cut] button if there is too much bass and press the [De-Esser] button if “s” sounds are too noticeable. The [Auto Leveler] button has 4 settings: off, green, yellow, and red. This feature also brings quiet and loud audio closer together, with red being the most noticeable. It’s similar to the [Compressor/Limiter] effect, but for your entire VRC-01 mix.
Lip Synch
AeroCaster automatically calculates and adjusts the delay between your audio and video. But if the sync for your mic and line sources appears off during your test stream, turn off the [Direct Monitor] button and then turn up the [Lip Sync Delay] knob on the VRC-01 until it is in sync. There is also an audio delay for the entire mix in the AeroCaster Live Audio settings tab.
Background Music
To add background music and sound effects, there are two options. The first option is to connect a music player to VRC-01’s eighth inch Line Input. Slide the Line In fader to the bold line three quarters of the way up, you can adjust it during production as needed. Play your device’s audio and slowly increase the volume on the music player until the “SIG / PEAK” indicator is mostly yellow.
The second way is to import audio files from your iPad. Tap the [+] button, choose “Audio,” and select a file to import. A [Play] icon will replace the [+] icon. To play the audio, tap anywhere on the clip, and tap it again to pause it. While it’s playing, you can adjust the audio level and enable looping. If you want to adjust those clip settings before playing it, turn off the [to Program directly] button. If you do this, you will need to directly tap the [Play] icon to play the clip.
In the AeroCaster Live app, the Audio tab in the bottom right corner has additional settings for audio sync, muting the entire mix, and adjusting the volume of background music and sound effects that are assigned to the Pad buttons.
MEDIA AND SCENES
Importing Media
AeroCaster can display images and video clips stored on the iPad. To add an image or video, tap the [+] icon on the MEDIA row, then choose “Still Image” or “Video.” Choose your source from the list on your iPad. To display or play the imported Media as a source, simply tap it on the Media row. For video clips, a thumbnail and [Play] icon will replace the [+] icon.
To play the video, tap anywhere on the thumbnail to send it to Program, and tap the [Pause] icon to pause it. While it’s playing, you can adjust the playback position, clip volume, and enable looping. If you want to adjust those clip settings before playing it, turn off the [to Program directly] button. If you do this, you will need to directly tap the [Play] icon to play the clip, and the [Take] button to send it to Program. To delete the clip, press and hold it and choose “Delete” from the pop-up menu.
At the end of the Media row is a [Trash Can] icon that you can tap to delete everything you imported. This will not erase it from the storage on your device. Still images with alpha channel are supported, simply import the image from the camera roll and add it to a DSK, which we will cover in the next section.
Not sure what alpha channel is? Some image files use this to tell software and hardware what parts of the image should be transparent when placed on top of another image or video.
DSK Setup
The Scene row contains your layouts and overlays. At the end of the row is an icon with “three dots,” tapping this gives you the option to delete or reset all scenes to default. Let’s set up a couple of text and media overlay scenes.
Tap the [+] button at the end of the Scene row. Choose [Text] from the list. Here, you can adjust the size, position, font, and colors of the text box. Once finished, tap [Save] to add it to your Scenes. Tap the [+] button again, and this time, choose [Media] from the list.
Tap [Not Set] to select a file that you already imported to the Media row, and then tap “Select” in the top right corner of the pop-up menu. You can now position, crop, and resize it within the preview area and tap [Save] to add it to your Scenes. To display either Scene, tap them on the Scene list. You can display up to two text or graphic overlay scenes at one time.
Composition Setup
You can also use Scenes to create layouts with multiple Input sources. “P in P” is short for Picture in Picture, which lets you overlay a source in a window with another source behind it. You can change the size, crop, and position of the window when you set up this Scene. “Split” places two sources side by side, with an option to adjust the dividing line, and “Quad” lets you show four sources at once. You can switch between Inputs and Scenes using either the VRC-01 or AeroCaster Live app.
STREAMING
Setup
Next, we will set up and test a livestream. With AeroCaster, you can stream to any single livestreaming platform that supports RTMP. The “Share” icon in the top right corner opens your Output settings. This is where you choose and set up your streaming platform and enable recording to the iPad.
For this example, we’ll be using Twitch to stream. There are also login options for YouTube and Facebook Live. Once you log in, there a few options to check. Choose the “Ingest Server” closest to you. Next, adjust the Bitrate. Start with “5000 kilobits per second” or check your streaming platform’s support pages for their recommendation. The higher the bitrate setting, the higher the quality. However, if your stream skips, stop the stream and lower the bitrate.
Leave the Resolution setting at 1080P, most streaming platforms recommend this. Then, tap the “Select as Destination” button to activate the streaming platform. When logged directly into a streaming service, you can view comments during your stream using the AeroCaster Live app, simply tap the comments tab. YouTube and Twitch also allow you to send comments.
If you want to switch accounts after you log in to YouTube, Facebook, or Twitch, each service has a different way to do this.
- Note that your login information is stored in Safari
- Clearing your Safari data in the iPad’s settings may erase your AeroCaster logins
- Note that Custom RTMP streams do not use logins
YouTube
If you log out of YouTube in the AeroCaster Live app and log in again, it will ask if you want to use the same account or another one.
If you want to use a different account or username:
- Tap the text that reads “Use another account“.
- Once you log in to a different account, it will be added to the list.
Facebook does not support switching accounts within AeroCaster Live at this time.
If you want to use a different account or username:
- In AeroCaster Live, log out of Facebook in the stream setup settings.
- Open Safari on the same iPad, go to the Facebook website, and log out of your account.
- Go back to AeroCaster Live and you can now log in with a different account.
Twitch
If you log out of Twitch in the AeroCaster Live app and log in again, it will ask if you want to Authorize AeroCaster Live to use the same account.
If you want to use a different account or username:
- Near the top, tap the purple text that reads “not you? log out.“
- You can now log in to Twitch with a different account.
Custom RTMP
You can also use “Custom” to stream to any livestreaming platform. When you log into your streaming service in your device’s web browser, you will typically see a “Stream URL” and “Stream Key”, which you can copy and paste into AeroCaster Live.
Going Live
Let’s start livestreaming. There are two ways to go live. Press the [On Air] button on the VRC-01 or tap the [Record] button in AeroCaster Live. Once streaming starts, you will see the duration of your stream, along with the current bitrate. You will also see a pop-up window with the URL to watch your stream. You can access this at any time during your stream by tapping the [Information] icon.
Stopping a Stream
If you press the [On Air] button or tap the [Record] button during livestreaming, a pop-up will ask if you want to stop it. Tap “OK” to confirm.
RECORDING
AeroCaster supports recording without streaming. To use this feature, disable your streaming destination and make sure that recording is enabled in the output settings. You can adjust the quality of the bitrate setting, it does not need to match the stream, but higher settings are only recommended with newer iPads.
In addition, you can have each individual AeroCaster Camera app record its own video for editing later. There is also a setting to send the recording to the iPad when you finish. Do not enable this setting if you need to start another recording shortly after you stop, as it will take time to transfer the individual camera recordings to the iPad.
It’s recommended to test these settings beforehand and make sure that your privacy settings on all your devices allow Camera, Microphone, and Local Network access.

PAD SETTINGS
Open the pad settings in AeroCaster LIVE, select the button and select the one you want to assign from the Input, Media, Scene, or Action lists. After saving the assignments, if you press the corresponding USER 1 through 6 buttons on the VRC-01, it will display that source or perform that action.
NETWORK CONNECTIONS
There are two ways to stream with AeroCaster Live:
1: Connect all devices to a Wi-Fi network that is connected to the Internet.
- A “mesh” router is easy to set up and will give you excellent results.
- They are available as a “2-pack” or “3-pack” to increase coverage.
2: Connect all devices to a hotspot for tethering, using either:
- A personal hotspot on an iPad with a cellular data plan.
- A personal hotspot on a phone with a cellular data plan.
- A dedicated mobile hotspot device with a data plan.
The easiest way is to use a Wi-Fi network:
- For the Wi-Fi router, make sure it supports wireless “AC” (aka Wi-Fi 5) or “Wi-Fi 6”.
- If you experience performance issues, disconnect any unused devices from the network.
- Keep your devices as close to the router’s antenna as possible.
- Keep your devices away from large speaker systems, microwaves, two-way radios, and other equipment that may impact Wi-Fi signals.
- Avoid placing equipment on the opposite side of brick and concrete walls.
- More tips on network setup in the article at the bottom of this support page.
The more reliable way is to use a USB-C adapter with Ethernet:
- You will still need a Wi-Fi router to connect everything.
- Wire the iPad to the Wi-Fi router using a compatible USB-C multiport adapter with Ethernet.
- The phones will connect to the iPad wirelessly, using the Wi-Fi router.
If you use an iPad or phone as a personal hotspot, or use a dedicated hotspot device:
- All devices need to be connected to the hotspot.
- A 4G/LTE connection is required, but 5G is recommended.
- You will need a strong signal to stream reliably.
- If using a phone as the hotspot, your fastest device should host it.
- Hosting on an iPad with a cellular plan may offer better performance than a phone.
- You can also run AeroCaster Camera on a host phone, but performance may be affected.
- Using an iPad or iPhone as a host will use more battery power, charging is recommended.