
- Livestreaming is easier than ever, and powerful tools can help content producers.
- After production, producers compress the livestream and send it to a service in the cloud for transcoding and delivery.
- Content Delivery Network or CDNs distribute high-bitrate files to viewers in disparate areas.
- Video retrieved from the internet plays in a player or app. Social media services supply these.
Livestreaming has become exponentially easier over the last few years. This accessibility allows creators to focus on producing the most engaging content possible. We’ll be providing a high-level overview of the livestreaming process. Before starting to livestream, you’ll typically choose a service provider to perform most of these steps. If streaming via a social media service like Facebook or YouTube, you’ll see very few of the details discussed below. With advanced services or workflows, there is an increased ability to control options.
It Starts with the Production
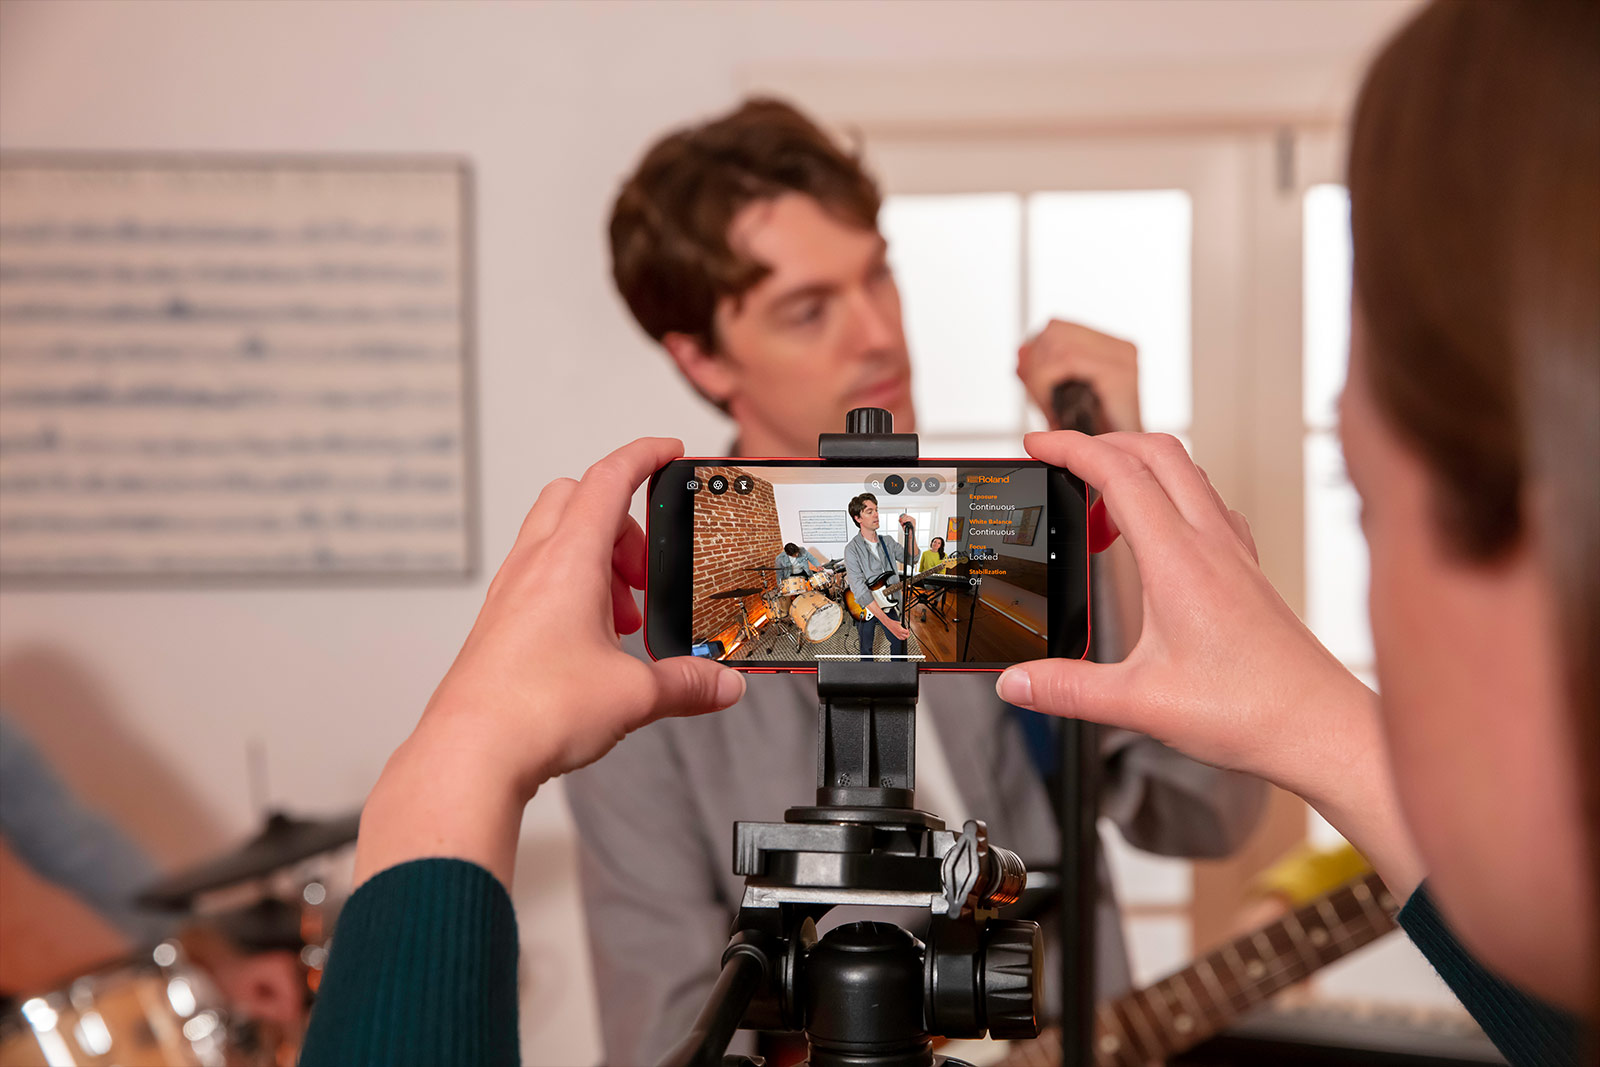
The first step of any livestream is production. This is where you create the audiovisual content that you will deliver to the audience. Production can be as simple as talking into your smartphone, or as complicated as the 122 cameras at this year’s Super Bowl. Either way, you end up with a single audiovisual stream to start the livestreaming process.
Encode and Stream to the Cloud
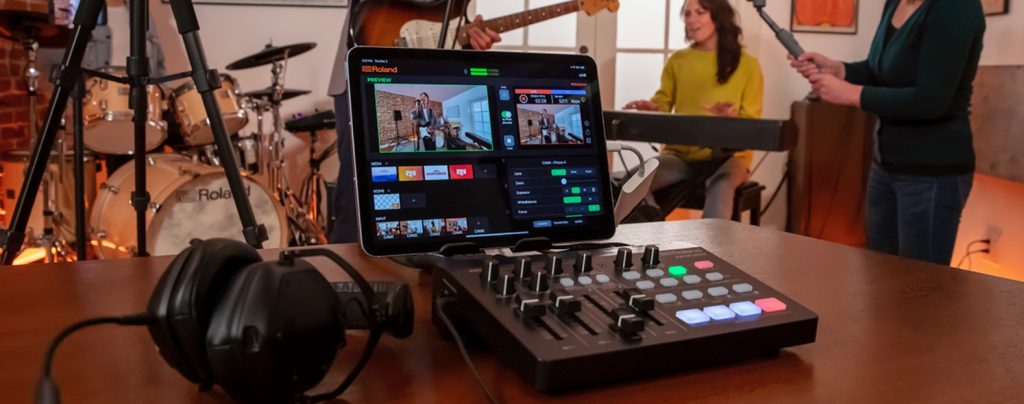
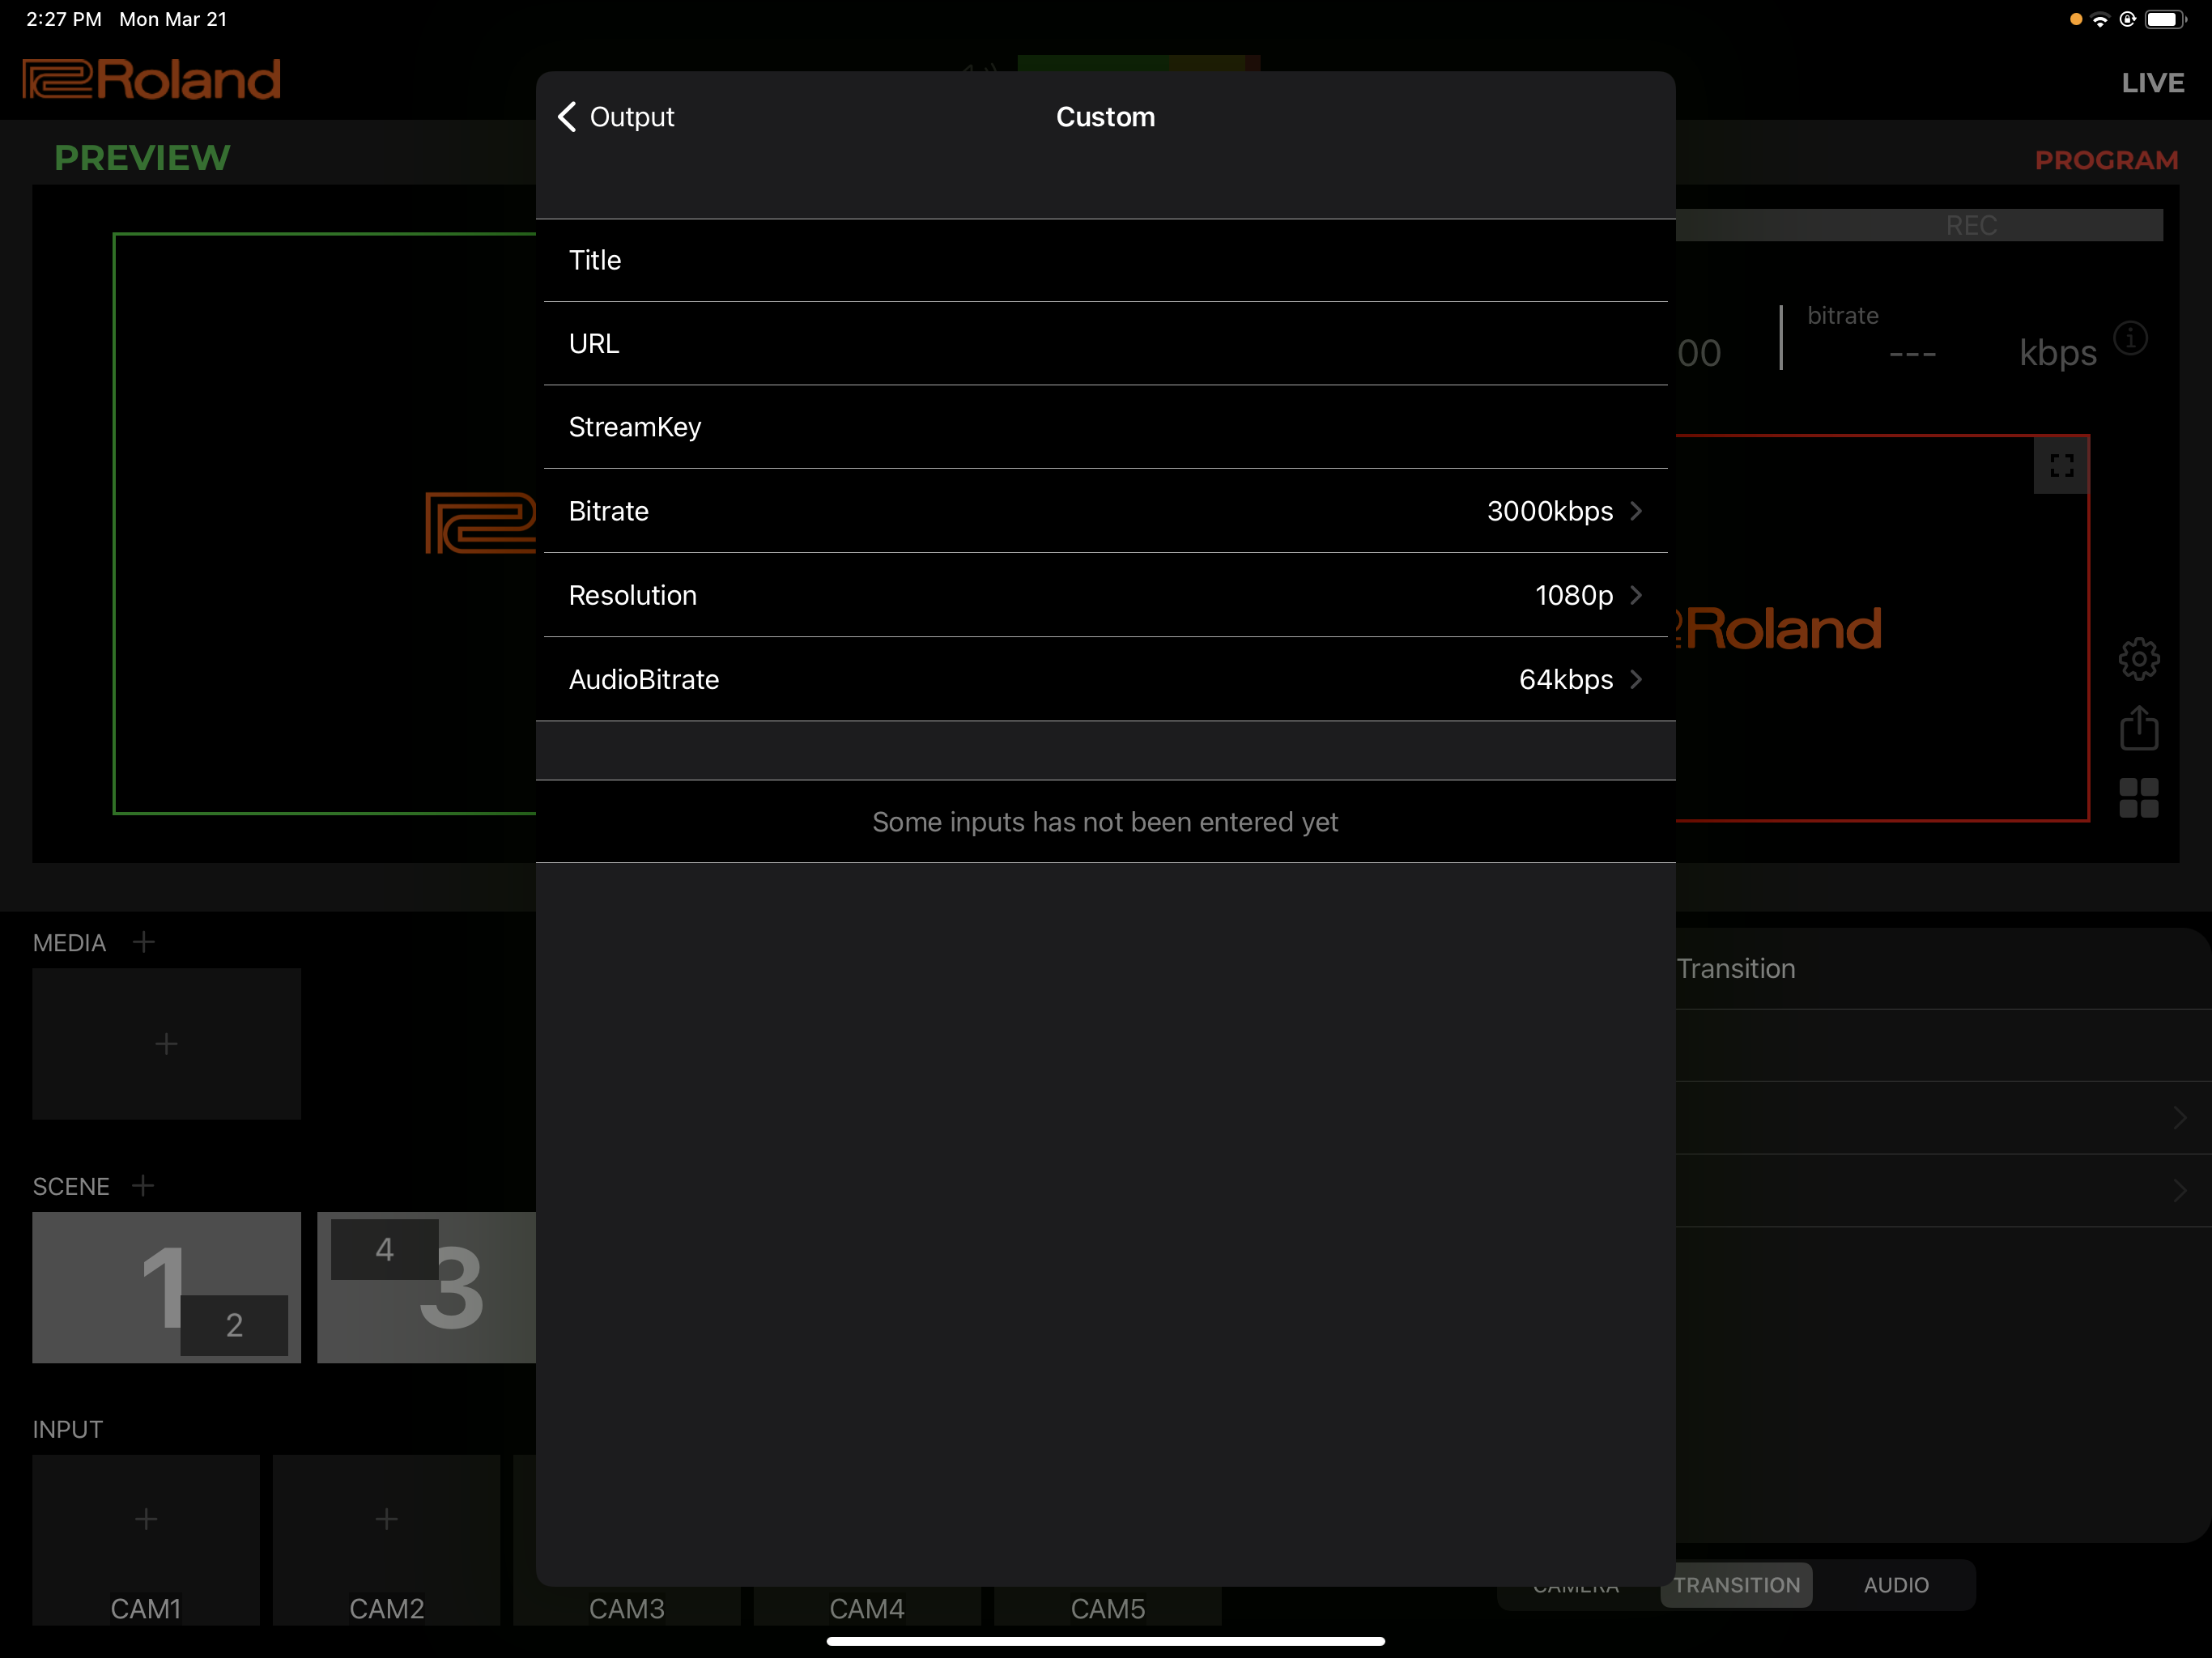
The next step after production is compressing the stream and sending it to a service in the cloud for transcoding and delivery. Usually, you’ll perform this operation in a hardware or software video mixer like the Roland AeroCaster or with a standalone encoder.
Why compression? As you may know, video is a very data-intensive medium; a second of uncompressed video can comprise up to 3 GB/second. So you have to compress the stream to send it to the cloud in real-time. Your encoder also needs to communicate to the cloud service to deliver the stream.
The first step of any livestream is production. This is where you create the audiovisual content that you will deliver to the audience.
Simplifying the Process
While this sounds complicated, most video mixers and encoders simplify the process. They do so by creating presets that interface with the service to manage both the compression and communication. So, if you’re streaming to Facebook or YouTube, you’ll choose that preset, log into your account, and you’ll be ready to go.
Compression Settings
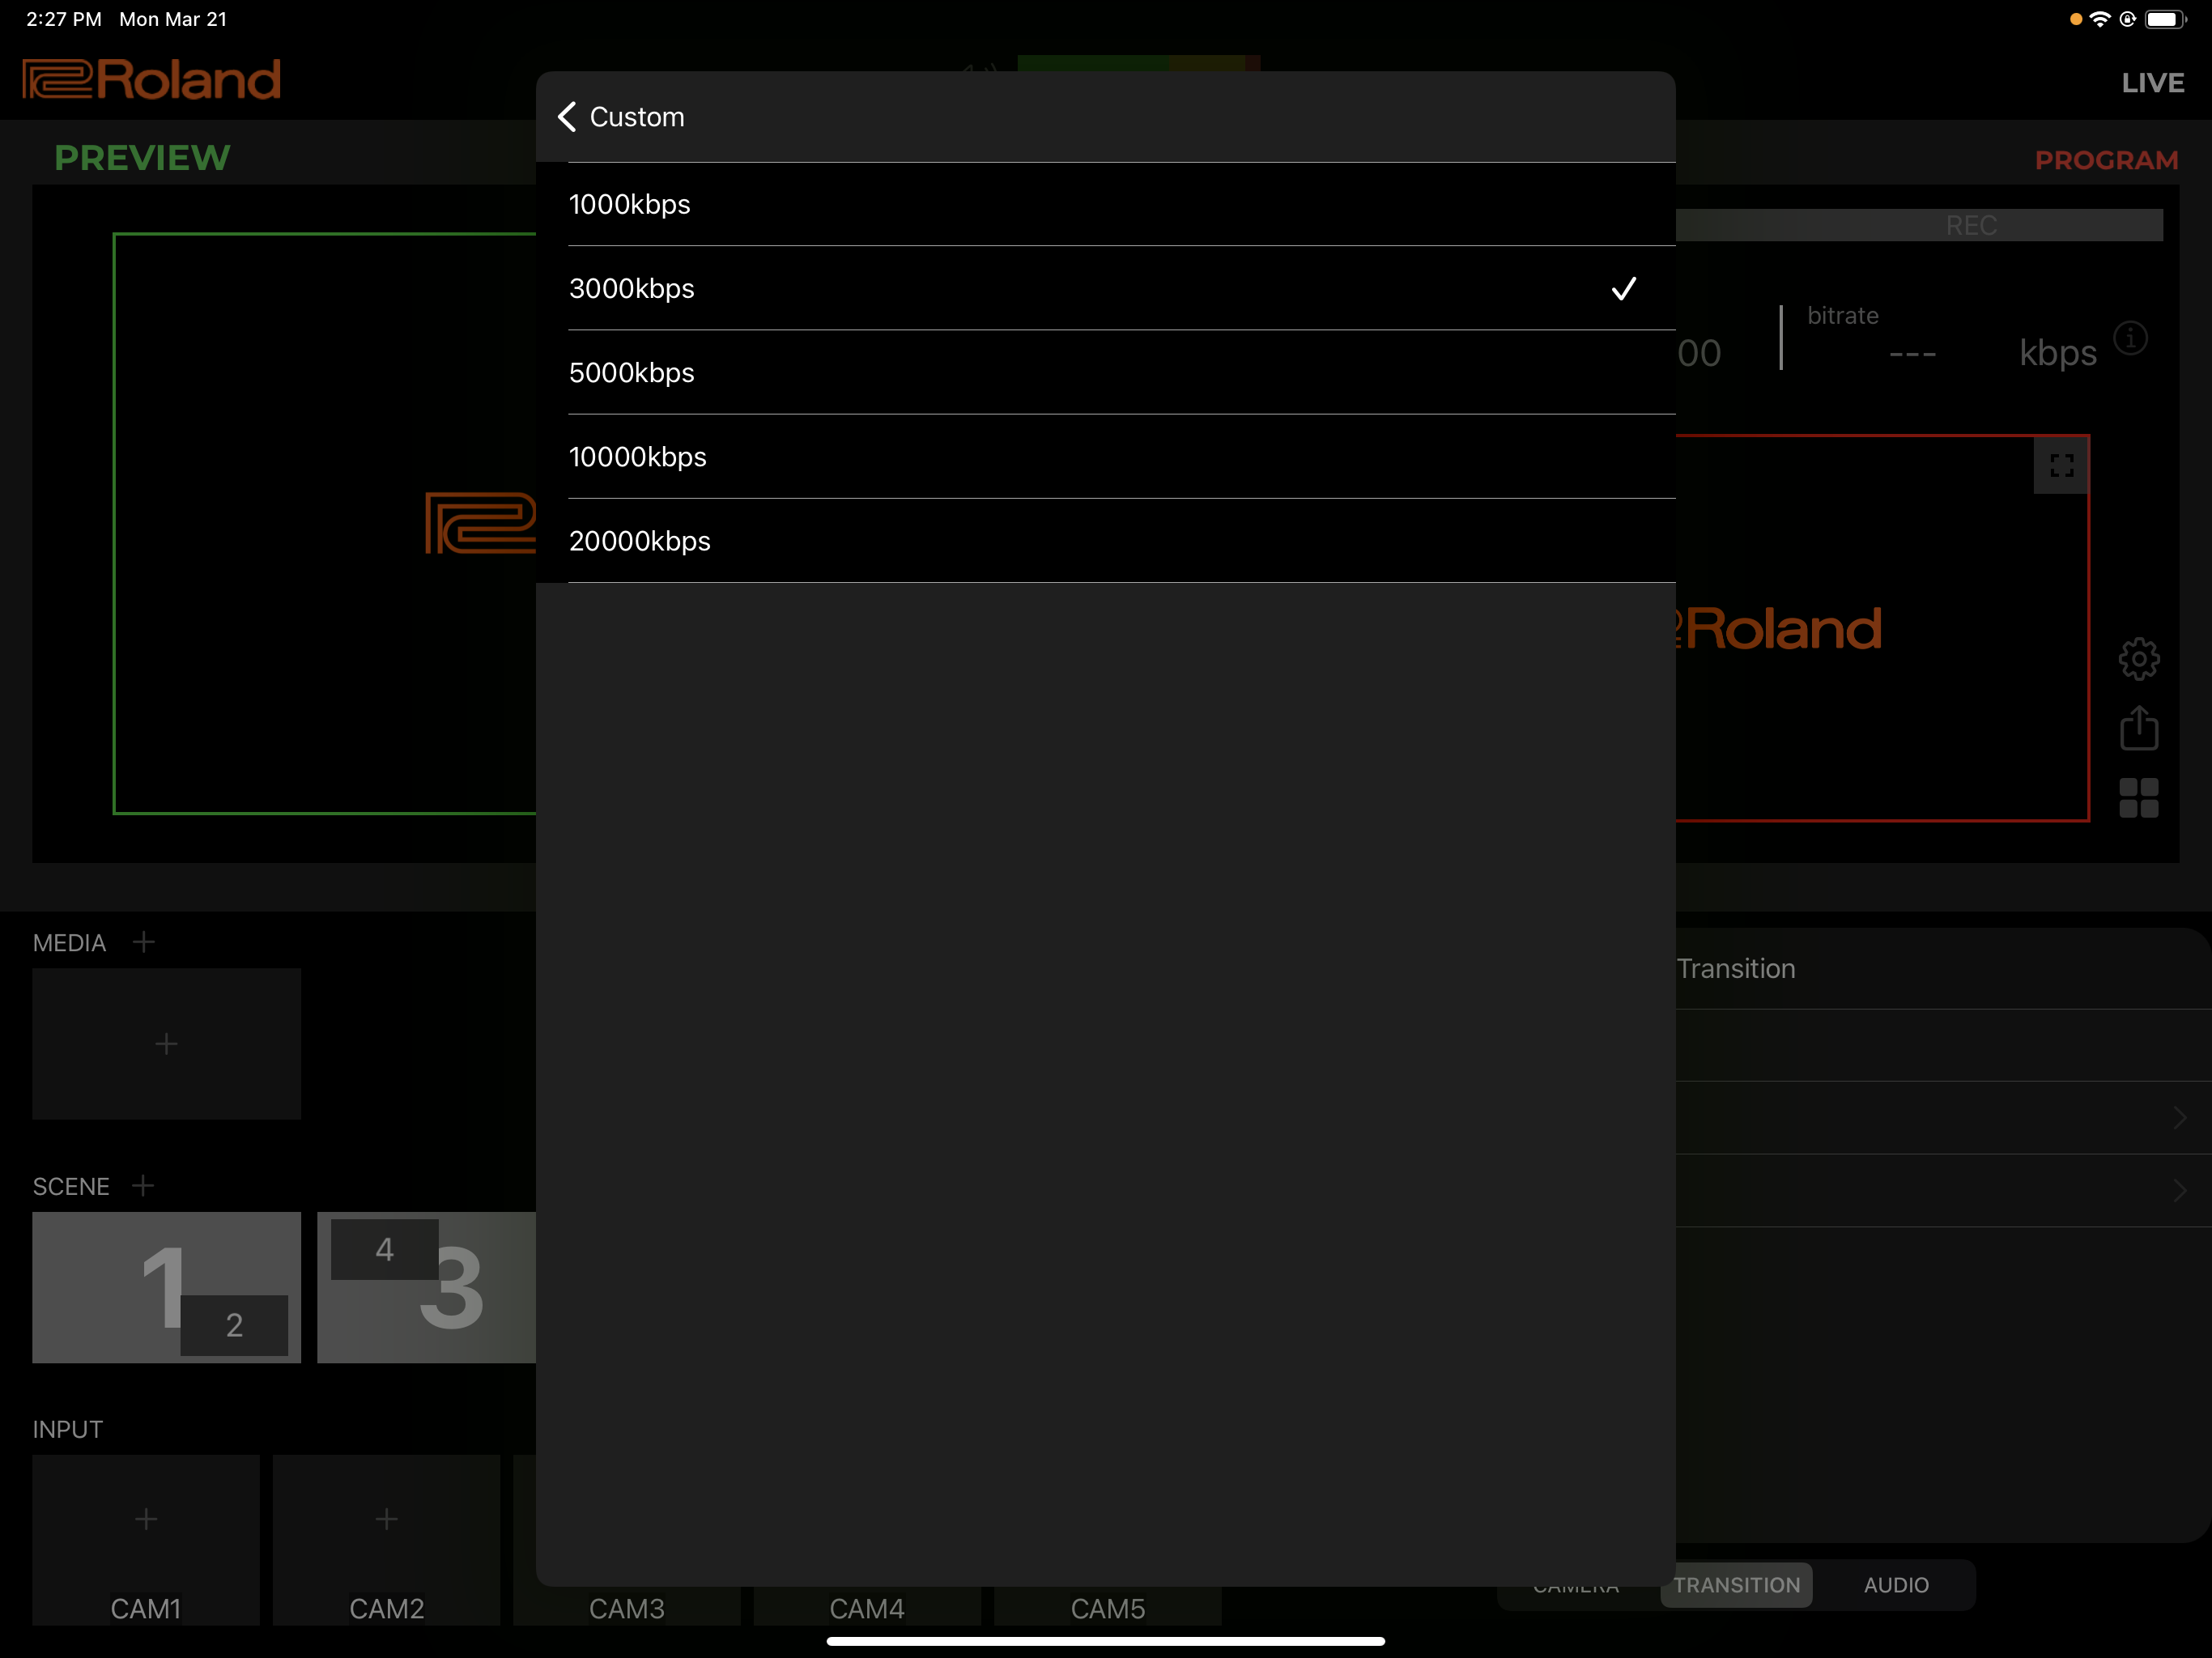
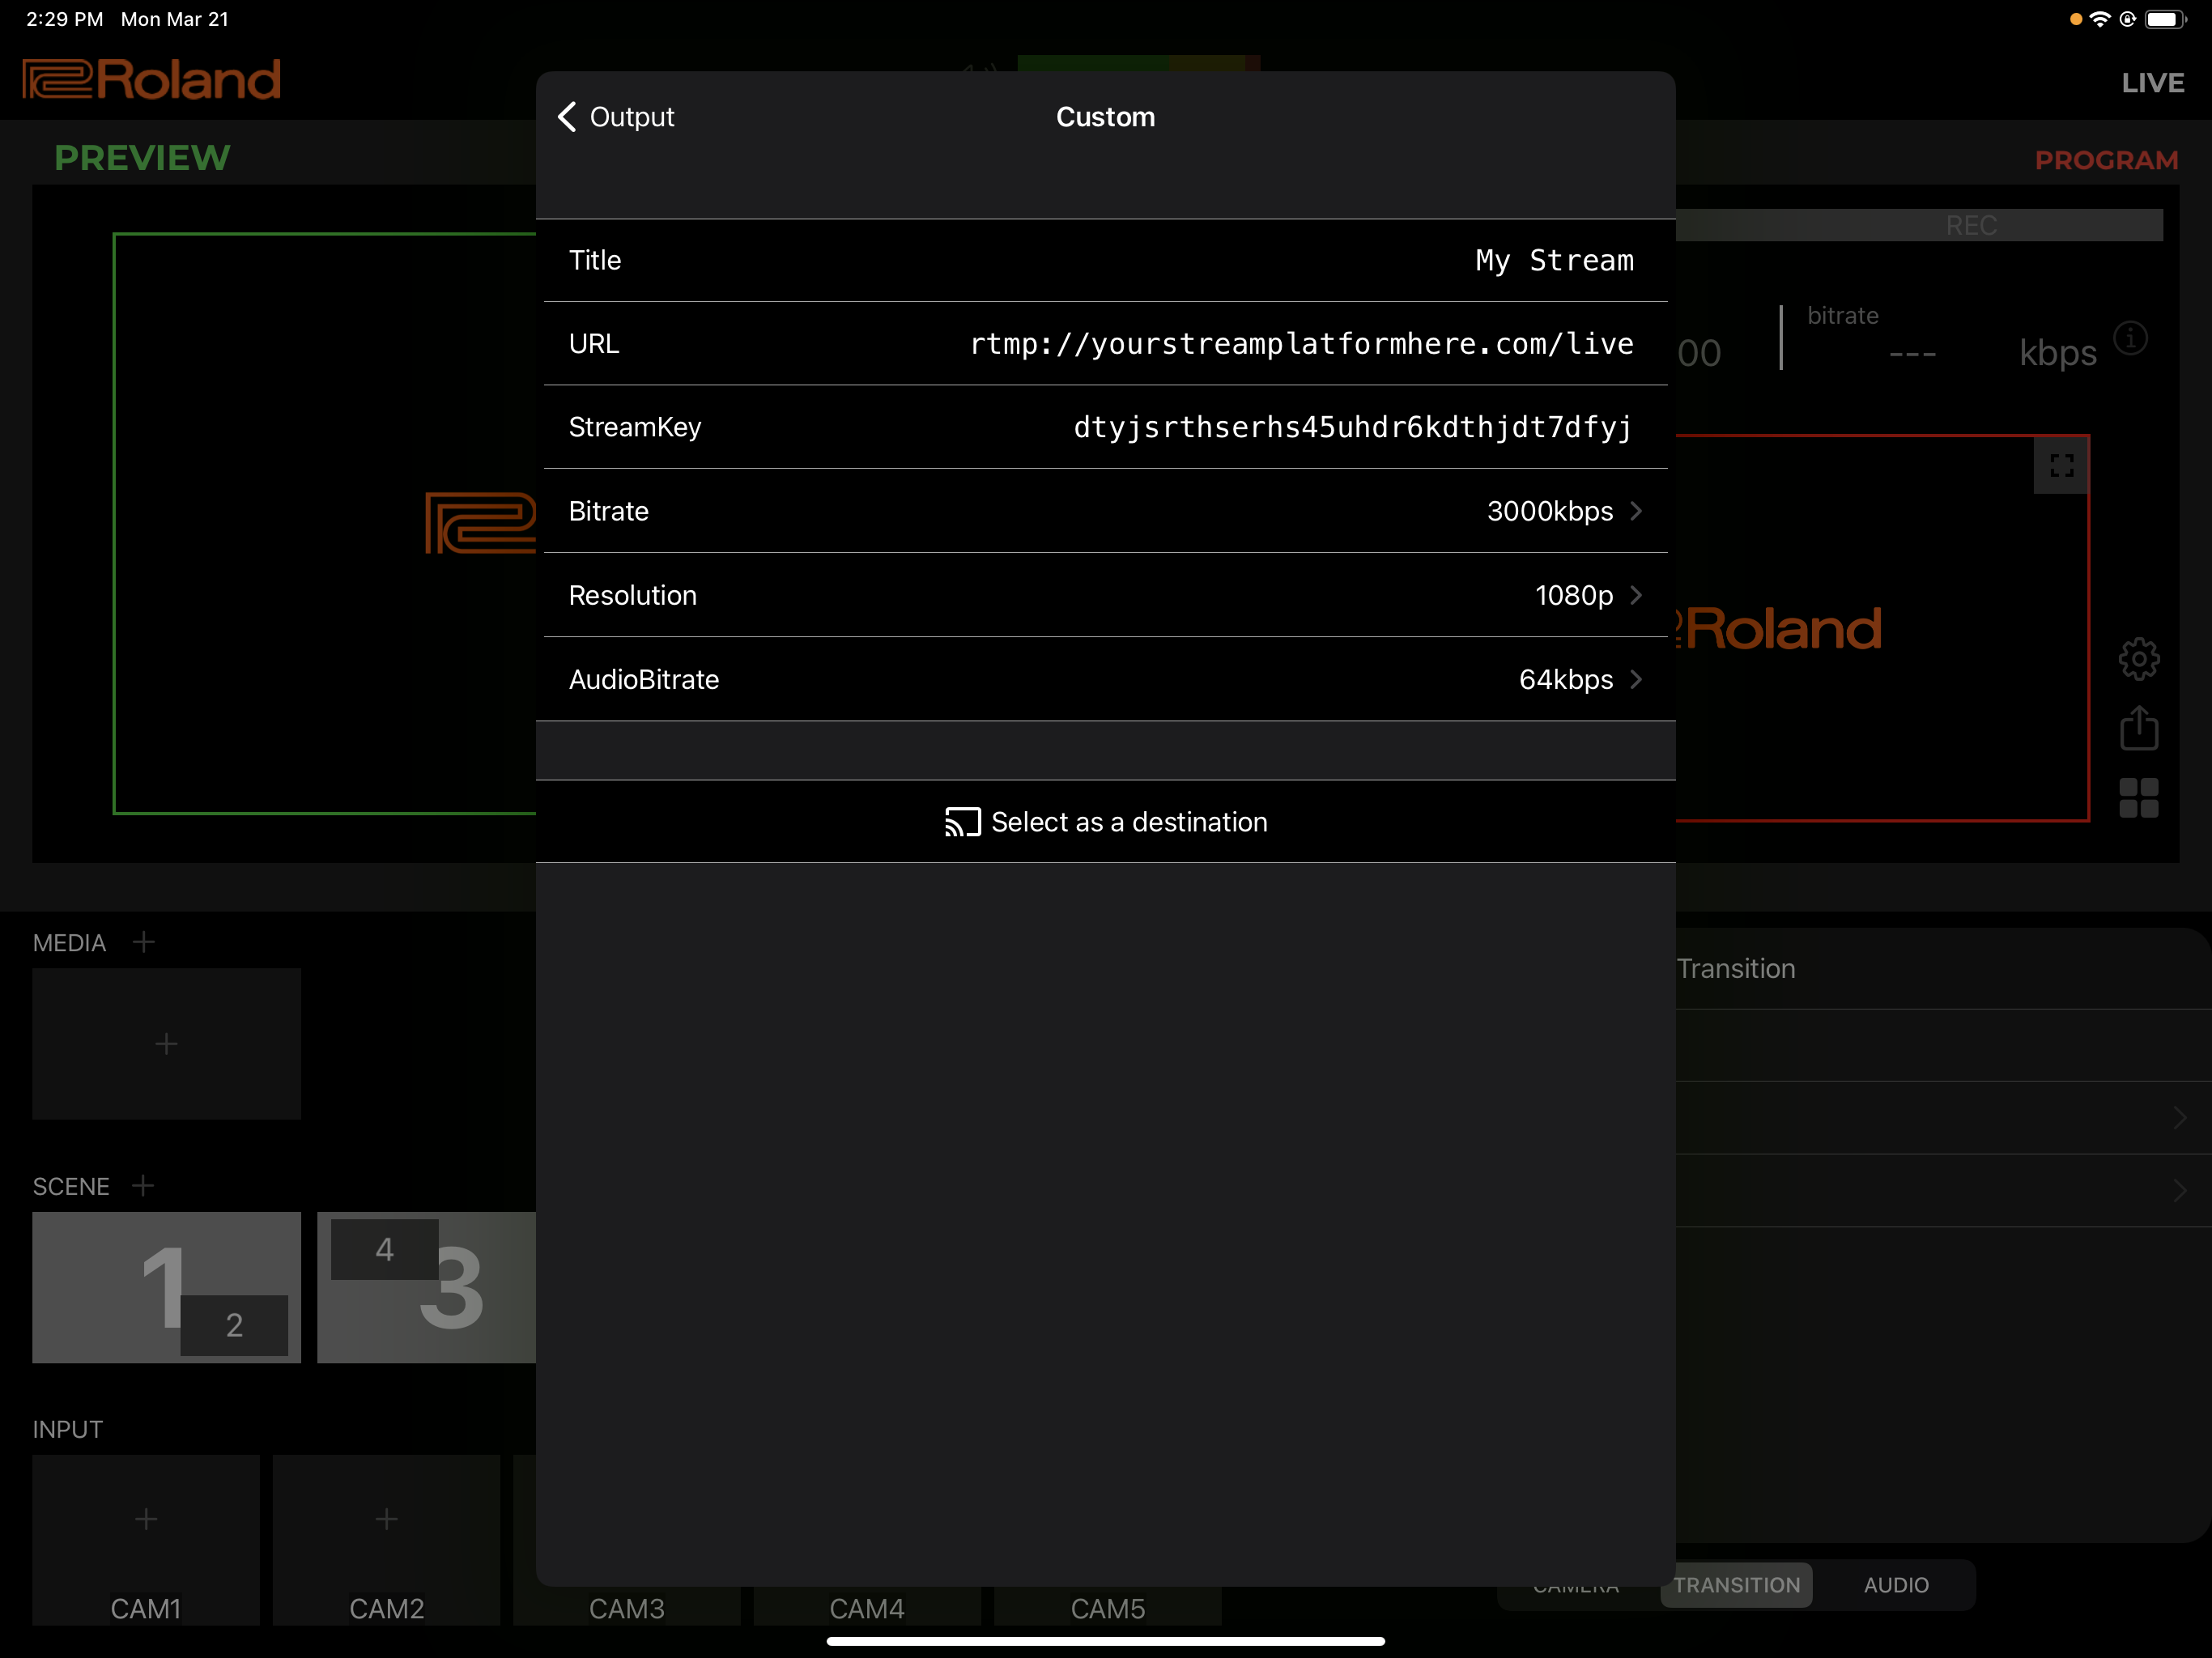
If there isn’t a preset, you’ll have to set the compression settings manually, which typically involves setting a bitrate for audio and video. See the manual settings below. Most services have recommended settings that you should check before configuring your encoder.
Video mixers and encoders simplify the process by creating presets that interface with the service to manage compression and communication.
Connecting to a Service
To connect to the service, you’ll have to find the server address and stream key from the service and plug it into your software. The services know that you need this information to get started, so they typically make it pretty simple to find.
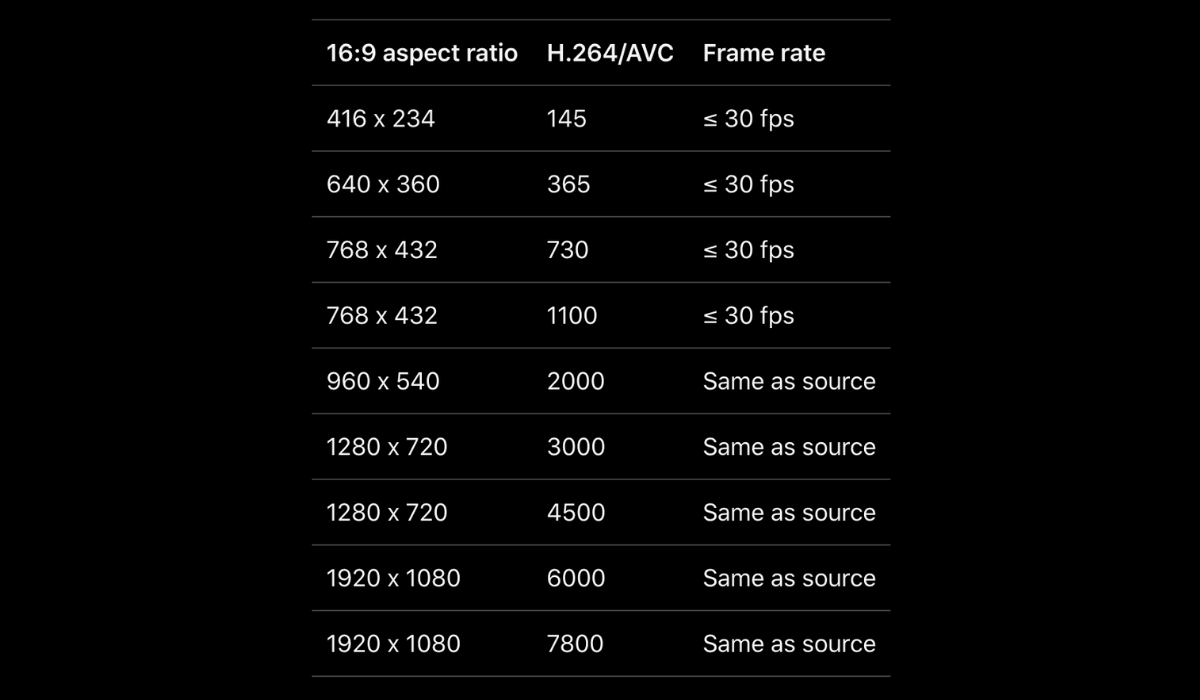
Obviously, you’ll need an internet connection to deliver the compressed stream to the service. As a rule of thumb, your capacity should be at least 2x the combined audio-video bitrate of the compressed stream. So, if you’re streaming the 5160 shown in Figure 1, you should have at least 10,320 of upload bandwidth.
Transcoding in the Cloud
Once the video gets delivered to the cloud, the streaming service transcodes it into what’s called an encoding ladder. This is for distribution to the various viewers. As you can see below, the encoding ladder rungs at different resolutions and data rates. This allows you to provide the optimum experience to viewers watching on a variety of devices via a variety of connection types and speeds.
As a rule of thumb, your capacity should be at least 2x the combined audio-video bitrate of the compressed stream.
Adjusting for Audience Types
When streaming via social media or most livestreaming services, you won’t have the ability to view the encoding ladder or make changes. That’s OK. In most instances, using the pre-defined ladder should be fine. The only time you might consider moving to a service that lets you adjust these options is if you’re streaming to an outlier audience. Examples would include viewers watching on extremely high or low bitrate connections. Otherwise, the services have immense experience and skilled compression staff optimizing settings.
Delivering Your Content via CDN
Once the streams get transcoded, you have to deliver them to the various viewers. Typically, this occurs via a Content Delivery Network or CDN. These are services designed to distribute high-bitrate files to viewers in disparate areas.
Without a content delivery network, all viewers connect back to a single server to retrieve the streams. This can overwhelm the distribution capacity of that server. If the viewers are geographically distant from the server, video packets travel over multiple hops on the public internet. This can delay or disrupt playback.
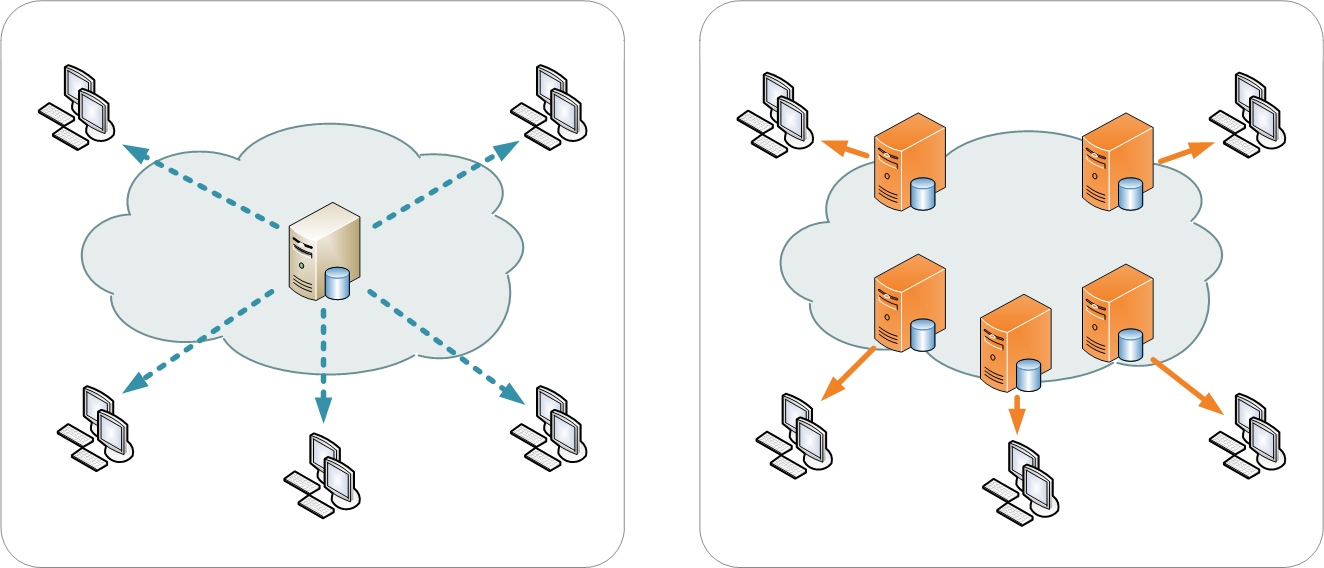
Advantages of CDN
CDNs boast two advantages over delivery from a single central server. First, they deploy a set of edge servers to deliver to viewers watching in those areas. Second, they use fast dedicated connections between the central server and the edge servers. This allows them to deliver the video to the edge as quickly as possible.
When a viewer clicks on a video distributed via CDN, the packets travel from the central server to the edge server via the CDN’s dedicated connection. This is faster and more efficient than the public internet. Then, when a second viewer in the same location clicks on the stream, packets already delivered to that edge location get sent to that viewer. This requires no further load on the central server. The process allows a CDN to deliver a higher-quality experience to many more users than a single server in the cloud.
All social media sites and livestreaming service providers use CDNs to deliver videos as part of the service. Many identify the CDNs used in their product literature. You won’t have to choose or work directly with a CDN unless you’re building a livestreaming infrastructure.
All livestreaming service providers supply players for browser-based playback. These players should work for computer-based and mobile viewing.
Players and Applications
Finally, all video retrieved from the internet is eventually played in a player or app. A player is what allows audiences to view the video in a browser, while an application is for viewing on mobile devices and smart TVs. If you’re streaming through a social media service, they supply the player and app. For Facebook Live, viewers watching in a browser automatically deploy the Facebook player. Those watching on mobile devices can watch in a browser or Facebook app.
All livestreaming service providers supply players for browser-based playback. These players should work for computer-based and mobile viewing. If you want an app for mobile viewing or compatibility with different Smart TVs, you’ll have to dig deeper, or perhaps even develop your own.
Roland AeroCaster
The Roland AeroCaster system makes livestreaming easy using devices you already own to create dynamic productions. With just an iPad and a few mobile phones, the Roland AeroCaster system will have you wirelessly switching and streaming on your favorite platform in minutes. To find out how easy livestreaming can be, sign up for our Roland AeroCaster email series below.


